Mobility exercises are important at any age. But they’re especially key as you get older (hello, 35-plus age range!), both to help you feel as good as you can each day and to set your body up for success for the long haul.
Doing regular mobility work can help you move through life as comfortably and efficiently as possible, even as your body changes with time.
“Mobility is important because it helps reduce pain and maintain function as we get older,” Dr. Jessica Leung, DPT, tells SELF. “It helps address challenges with walking, balance, and stamina, and reduces risk for falls or fatigue.”
Here’s everything you need to know about how mobility exercises affect your body, how to slot them into your daily schedule, plus a whole list of moves to try so you can feel your best.
Mobility versus flexibility versus strength—what’s the difference?
Mobility, flexibility, and strength often get lumped together, but they’re not interchangeable.
“Strengthening is more so developing the force necessary to stabilize your joints and support mobility,” Dr. Leung says. “Whereas mobility is the amount of controlled range of motion you have in a joint.”
Flexibility is your muscles’ ability to relax and lengthen—think how far you can stretch into a butterfly stretch, Dr. Leung explains. Together, they create a body that not only moves freely, but also moves well and stays resilient.
Why mobility exercises are essential
When we talk about mobility exercises, we mean anything that improves motion through your joints, muscles, nerves, and connective tissues. This can include dynamic stretches (exercises where you move fluidly through a joint’s range of motion) as well as static stretches (where you hold still in a certain position). And as the decades fly by, this type of movement can actually help mitigate some of the not-so-pleasant changes that naturally happen in our bodies over time.
For one, our joints can become less lubricated, and the space between the segments of our spine can narrow, Winnie Yu, PT, DPT, CSCS, a NYC-based physical therapist and strength coach, tells SELF.
These shifts can increase your chances of certain injuries and conditions such as herniated discs, bone spurs, arthritis, and spinal stenosis, or the narrowing of the spaces within the spine that causes pressure on the spinal cord and nerves.
“Especially if you target mobility early on, and you integrate it as part of your lifestyle, you can reduce risk of injuries,” Dr. Yu says. On a less serious scale, mobility work can also combat chronic annoyances like back aches and cranky hips that get in the way of you feeling your best day to day.
That’s particularly true for those of us who spend a big chunk of the day sitting, which tightens up the hips and back and encourages not-so-ideal posture. On that end, mobility exercises can help you stand (or sit) up straighter while also easing the tightness that comes from all that time parked on your butt, Dr. Yu explains. A 20-something may not feel all that achy from a day spent hunched over a computer, but those of us in our mid to late 30s (and beyond) likely will, which is why targeted stretches can be lifesavers.
Weaving in mobility moves can also benefit your workouts. That’s because if you’re tight in certain areas—say, your upper back, mid-back, or hips—you can compensate by overusing other areas, like your shoulders, neck, and lower back, ultimately upping your chances of strain and injuries there. By loosening up problem areas, you can potentially sidestep these issues altogether, improving your ability to work out for the long haul.
How to fit mobility exercises into your day
You can either group these moves into standalone sessions to do throughout the day or consider them a great warm-up for your workout.
For the latter, pick dynamic versions (ones where you’re moving in and out of a position) rather than static ones, where you get into a position and hold. That’s because dynamic moves can improve range of motion, boost muscle tissue extensibility, and promote blood flow to the muscles you’re going to be working. This can reduce your risk of straining muscles while also leveling up your performance, since your tissues are more pliable and ready to work, Dr. Yu explains. In other words, you’ll get more bang for your workout buck.
Your mobility routine doesn’t have to be long.
“Even ten minutes here and there each day, just to maintain is something that will help in a longer-lasting way,” Dr. Leung says.
As for which exercises to pick, let your body be the guide. If you just want to do some preventive mobility work, choose moves that hit both your hips and back—for example, the half-kneeling side stretch and 90-90 with side reach. If you’re noticing your back is especially tight, then prioritize exercises that really hone in on that area (like cat-cow and side-lying open book, for instance). Vice-versa with your hips. If those are what’s really bothering you, focus on moves like dynamic hip opener and hip switches.
You’ve also got options for how to structure the sequence: If you’re someone who generally doesn’t have any aches or pains and you’re doing mobility work preventively, you can perform it as a circuit style, Dr. Yu says. But if you’re really tight in a specific area and that impedes your motion elsewhere, you’d be better off starting with stretches that target that spot, and complete all your rounds before moving on to other kinds.
Whichever exercises you choose, perform them at a slow, controlled pace, Dr. Yu says. That’ll help you target the intended areas and reduce your chances of straining something (like your lower back, for example). For the dynamic stretches, aim to go a little bit deeper into the movement with each rep, but never crank right into the end range of motion, Dr. Yu says. If something feels painful or just not right, back off, she says.
Directions
Create your routine based on your mobility goal:
- Warm-up: Pick four to five dynamic exercises from the list below, choosing two or so full-body moves and about three that target the area your workout will hit. Complete 10 to 12 reps of each, and 2 to 3 sets total.
- General daily mobility: Pick four to five exercises. Do 10 to 12 reps of each—or hold for 30 seconds if you’re doing a statics stretch—and perform two to three sets. This might be the choice for you if you generally feel okay but want to work on your mobility preventatively.
- A targeted, serious mobility boost: Choose eight to 10 exercises and do each for two to three sets of 10 to 12 reps. Repeat three times a week, Dr. Yu says. This might be your move if you wake up every day feeling super stiff.
Quick note: While these exercises are great suggestions, if you’re wrestling with chronic symptoms or lingering pain, check in with a medical professional (ideally a physical therapist) before getting started, Dr. Yu advises.
-
n
- Start in a half-kneeling lunge position by stepping your left leg in front, bending it to 90 degrees, and planting that foot firmly on the ground. Rest your right knee on the ground and extend your right shin directly behind it. Place your left hand on your hip and let your right hand rest by your side. This is the starting position.
n
- Reach your right arm up and over to your left side as you bend your torso to the left. Pause when you feel a stretch on your right side, then return to the starting position.
n
- That’s 1 rep. Continue for 10–12 reps, then switch sides and repeat.
n
nThis is a stellar one for folks who spend all day sitting hunched over a computer, as that tends to tighten up the hip flexors and upper back. This stretch targets both areas at once.“,”contentType”:”photo”,”credit”:”Katie Thompson”,”segmentedSources”:{“sm”:[{“height”:320,”width”:320,”url”:”https://media.self.com/photos/679bc8db6c89faf880e4f676/master/w_320,c_limit/winnie-half-kneeling-side-stretch.gif”},{“height”:640,”width”:640,”url”:”https://media.self.com/photos/679bc8db6c89faf880e4f676/master/w_640,c_limit/winnie-half-kneeling-side-stretch.gif”}],”md”:[{“height”:640,”width”:640,”url”:”https://media.self.com/photos/679bc8db6c89faf880e4f676/master/w_640,c_limit/winnie-half-kneeling-side-stretch.gif”},{“height”:1280,”width”:1280,”url”:”https://media.self.com/photos/679bc8db6c89faf880e4f676/master/w_1280,c_limit/winnie-half-kneeling-side-stretch.gif”}],”lg”:[{“height”:1024,”width”:1024,”url”:”https://media.self.com/photos/679bc8db6c89faf880e4f676/master/w_1024,c_limit/winnie-half-kneeling-side-stretch.gif”},{“height”:2048,”width”:2048,”url”:”https://media.self.com/photos/679bc8db6c89faf880e4f676/master/w_2048,c_limit/winnie-half-kneeling-side-stretch.gif”}],”xl”:[{“height”:1280,”width”:1280,”url”:”https://media.self.com/photos/679bc8db6c89faf880e4f676/master/w_1280,c_limit/winnie-half-kneeling-side-stretch.gif”}],”xxl”:[{“height”:1280,”width”:1280,”url”:”https://media.self.com/photos/679bc8db6c89faf880e4f676/master/w_1280,c_limit/winnie-half-kneeling-side-stretch.gif”}]}}}” data-testid=”GallerySlideWrapper”>

Katie Thompson
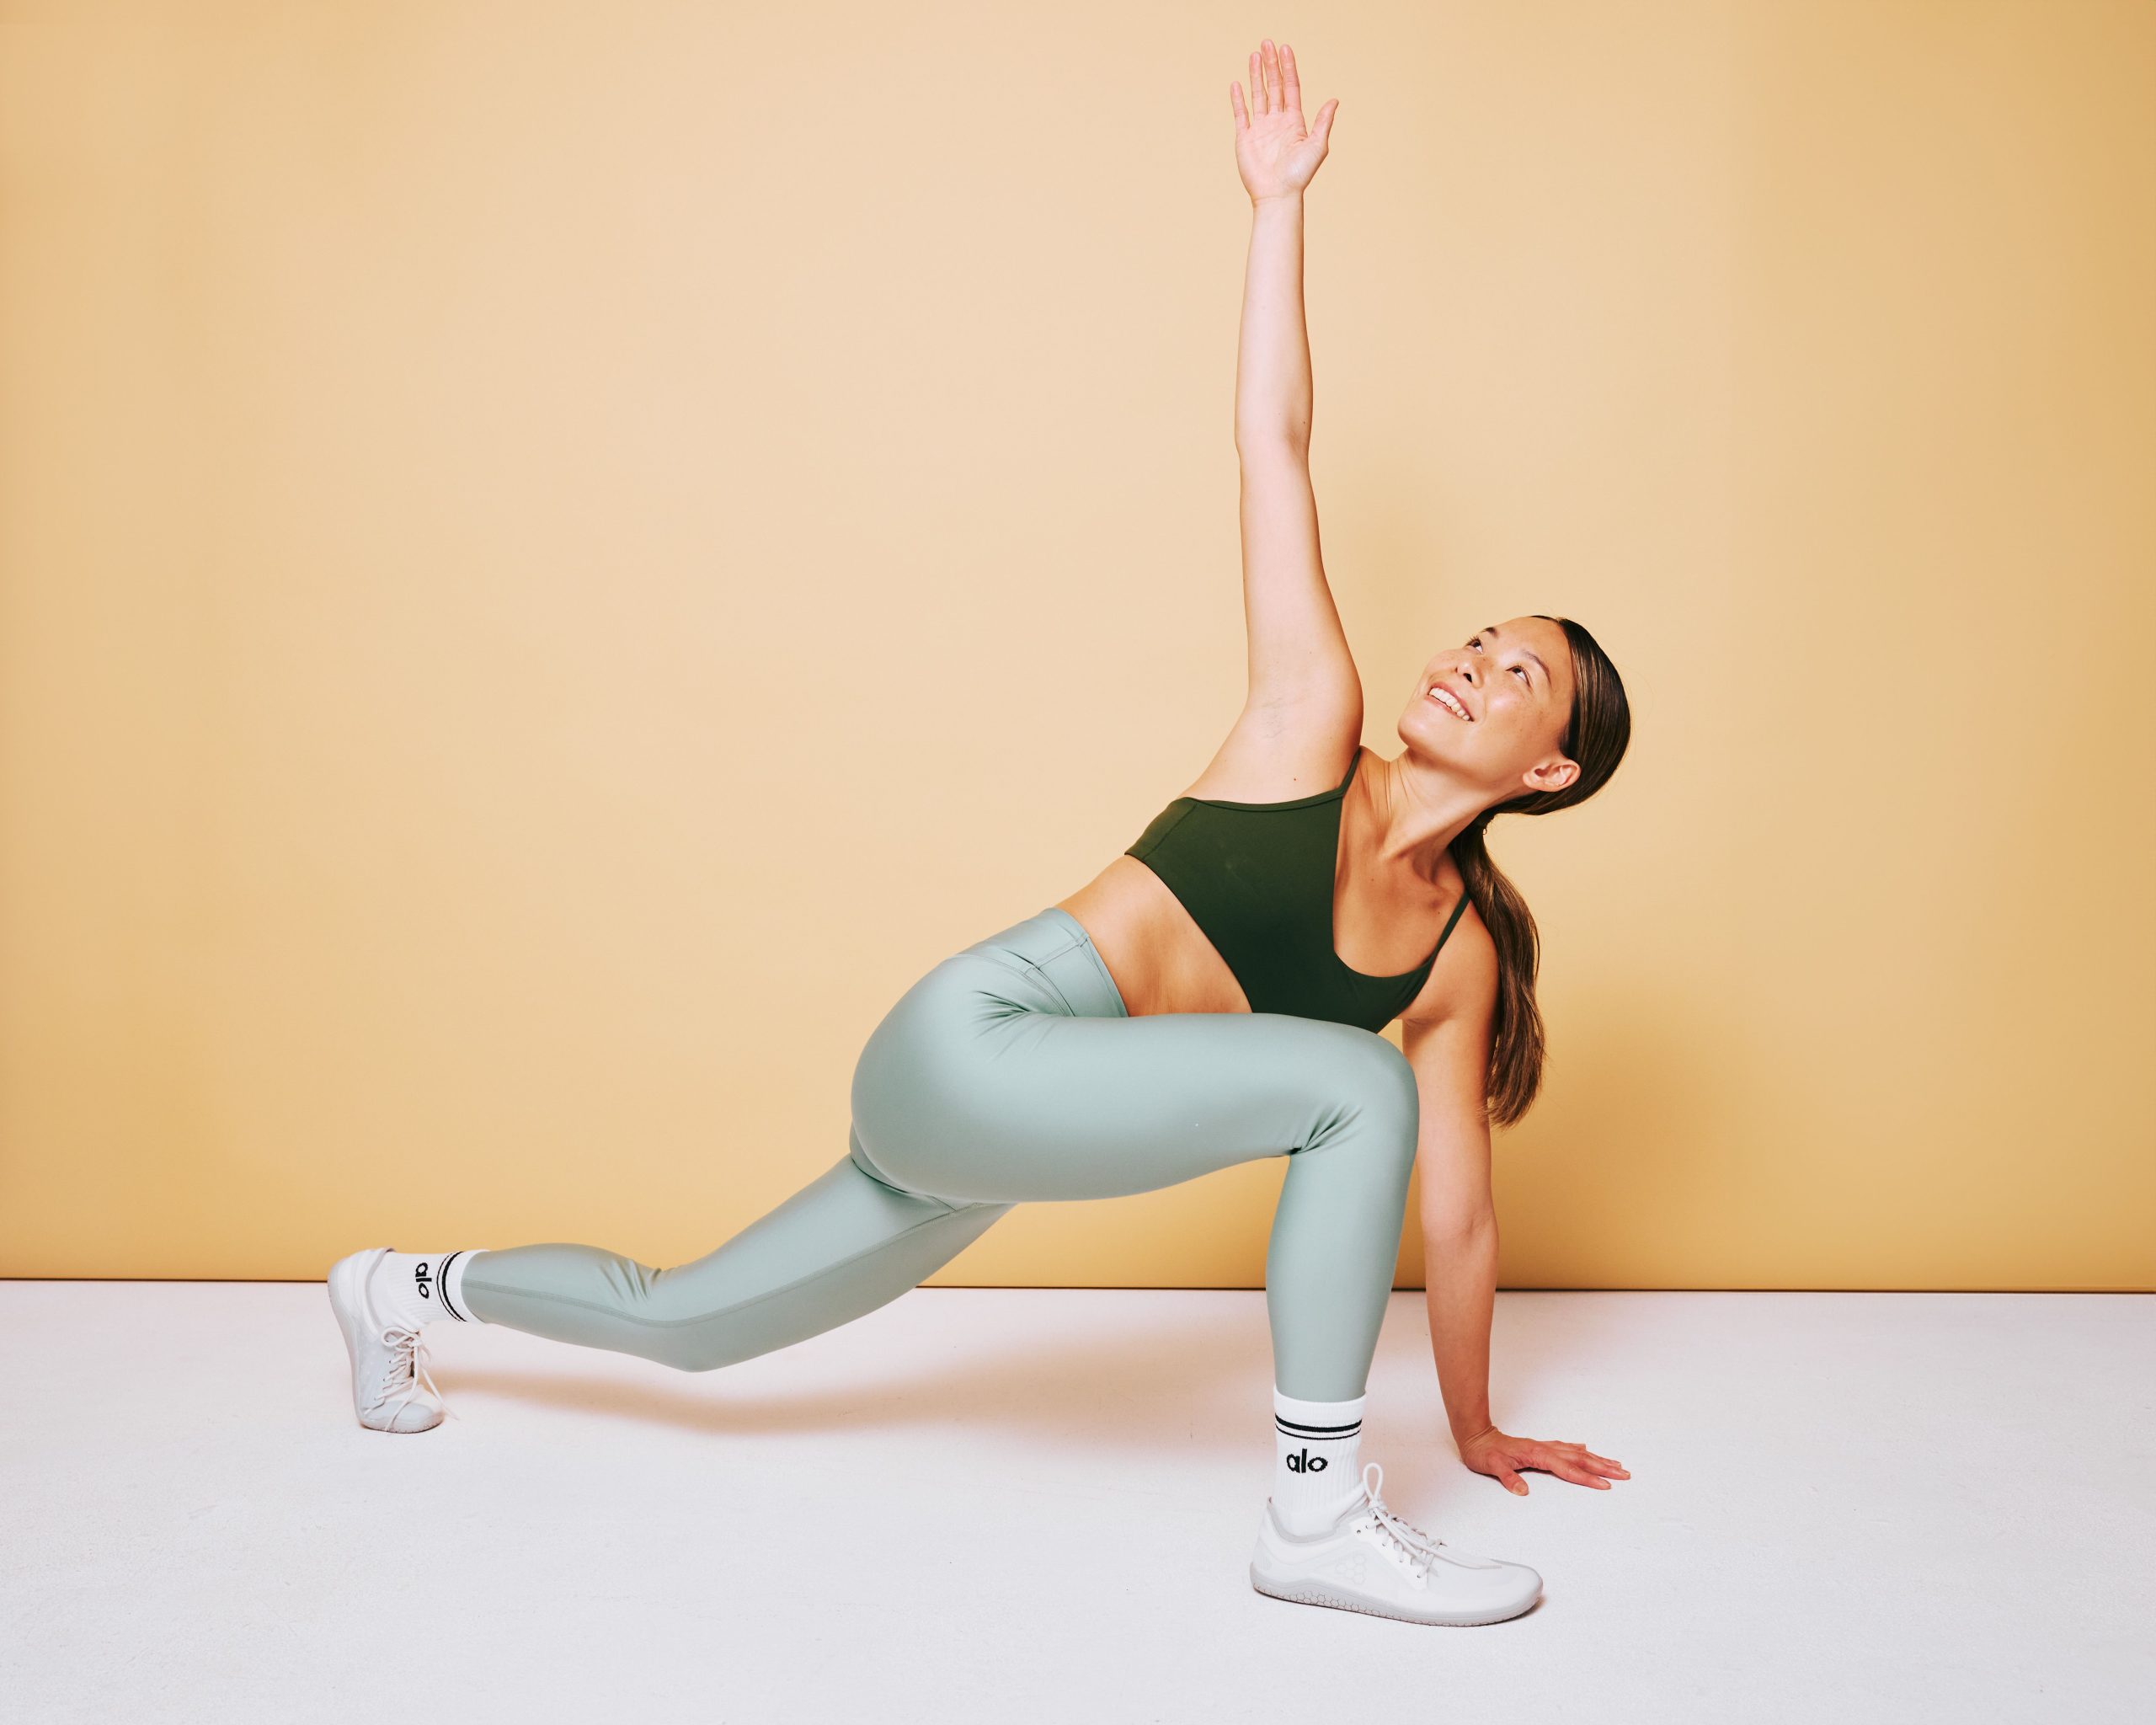
1. Half-Kneeling Side Stretch
- Start in a half-kneeling lunge position by stepping your left leg in front, bending it to 90 degrees, and planting that foot firmly on the ground. Rest your right knee on the ground and extend your right shin directly behind it. Place your left hand on your hip and let your right hand rest by your side. This is the starting position.
- Reach your right arm up and over to your left side as you bend your torso to the left. Pause when you feel a stretch on your right side, then return to the starting position.
- That’s 1 rep. Continue for 10–12 reps, then switch sides and repeat.
This is a stellar one for folks who spend all day sitting hunched over a computer, as that tends to tighten up the hip flexors and upper back. This stretch targets both areas at once.
-
n
- Sit on the floor with your left leg bent in front of you so that your shin is parallel to your body and your right leg bent to 90 degrees and positioned so that the right knee is pointing to the right, with your shin extending behind. Clasp your hands together in front of your chest. This is the starting position.
n
- From here, raise your right knee up as high as you comfortably can while keeping the right foot glued to the ground. Lower your right knee back to the ground to return to the starting position.
n
- Now shift your weight forward and press through your knees to come into an upright position. Pause for a moment, then lower down to return to the starting position. That’s 1 rep.
n
- Continue for 10–12 reps, then switch sides and repeat.
n
nA lot of us don’t regularly move our hips through their full range of motion—this exercise is a great one to do just that, Dr. Yu says. It also hits a little bit of the lower back too.“,”contentType”:”photo”,”credit”:”Katie Thompson”,”segmentedSources”:{“sm”:[{“height”:320,”width”:320,”url”:”https://media.self.com/photos/679bc8dc8cff13c4935ae226/master/w_320,c_limit/winnie-dynamic-hip-opener.gif”},{“height”:640,”width”:640,”url”:”https://media.self.com/photos/679bc8dc8cff13c4935ae226/master/w_640,c_limit/winnie-dynamic-hip-opener.gif”}],”md”:[{“height”:640,”width”:640,”url”:”https://media.self.com/photos/679bc8dc8cff13c4935ae226/master/w_640,c_limit/winnie-dynamic-hip-opener.gif”},{“height”:1280,”width”:1280,”url”:”https://media.self.com/photos/679bc8dc8cff13c4935ae226/master/w_1280,c_limit/winnie-dynamic-hip-opener.gif”}],”lg”:[{“height”:1024,”width”:1024,”url”:”https://media.self.com/photos/679bc8dc8cff13c4935ae226/master/w_1024,c_limit/winnie-dynamic-hip-opener.gif”},{“height”:2048,”width”:2048,”url”:”https://media.self.com/photos/679bc8dc8cff13c4935ae226/master/w_2048,c_limit/winnie-dynamic-hip-opener.gif”}],”xl”:[{“height”:1280,”width”:1280,”url”:”https://media.self.com/photos/679bc8dc8cff13c4935ae226/master/w_1280,c_limit/winnie-dynamic-hip-opener.gif”}],”xxl”:[{“height”:1280,”width”:1280,”url”:”https://media.self.com/photos/679bc8dc8cff13c4935ae226/master/w_1280,c_limit/winnie-dynamic-hip-opener.gif”}]}}}” data-testid=”GallerySlideWrapper”>

Katie Thompson
2. Dynamic Hip Opener
- Sit on the floor with your left leg bent in front of you so that your shin is parallel to your body and your right leg bent to 90 degrees and positioned so that the right knee is pointing to the right, with your shin extending behind. Clasp your hands together in front of your chest. This is the starting position.
- From here, raise your right knee up as high as you comfortably can while keeping the right foot glued to the ground. Lower your right knee back to the ground to return to the starting position.
- Now shift your weight forward and press through your knees to come into an upright position. Pause for a moment, then lower down to return to the starting position. That’s 1 rep.
- Continue for 10–12 reps, then switch sides and repeat.
A lot of us don’t regularly move our hips through their full range of motion—this exercise is a great one to do just that, Dr. Yu says. It also hits a little bit of the lower back too.
-
n
- Start in a modified forearm side plank by propping your body up on your left forearm, with your elbow stacked underneath your shoulder and your hand in front of your body. Rest your left knee and lower leg on the ground and extend your right leg straight. Squeeze your abs and glutes to lift your hips off the floor.
n
- Place your right arm on your right hip. Your shoulders, hips, and feet should all be in a straight line. This is the starting position.
n
- With control, lift your right leg up about a foot or two, then slowly lower it back to the starting position. That’s 1 rep.
n
- Continue for 10–12 reps, then switch sides and repeat.
n
nOkay, so this one isn’t technically a stretch—it’s more of a strength move that’s great for improving core stability and hip strength. That’s important because being strong in those areas can protect your back by reducing the chances of it taking on too much stress during daily life. This exercise is also a dynamic move for your legs, which makes it a good choice pre-workout or really any time you want to get your blood flowing.“,”contentType”:”photo”,”credit”:”Katie Thompson”,”segmentedSources”:{“sm”:[{“height”:320,”width”:320,”url”:”https://media.self.com/photos/679bc8e139935da5394c4bac/master/w_320,c_limit/winnie-side-plank-with-abduction.gif”},{“height”:640,”width”:640,”url”:”https://media.self.com/photos/679bc8e139935da5394c4bac/master/w_640,c_limit/winnie-side-plank-with-abduction.gif”}],”md”:[{“height”:640,”width”:640,”url”:”https://media.self.com/photos/679bc8e139935da5394c4bac/master/w_640,c_limit/winnie-side-plank-with-abduction.gif”},{“height”:1280,”width”:1280,”url”:”https://media.self.com/photos/679bc8e139935da5394c4bac/master/w_1280,c_limit/winnie-side-plank-with-abduction.gif”}],”lg”:[{“height”:1024,”width”:1024,”url”:”https://media.self.com/photos/679bc8e139935da5394c4bac/master/w_1024,c_limit/winnie-side-plank-with-abduction.gif”},{“height”:2048,”width”:2048,”url”:”https://media.self.com/photos/679bc8e139935da5394c4bac/master/w_2048,c_limit/winnie-side-plank-with-abduction.gif”}],”xl”:[{“height”:1280,”width”:1280,”url”:”https://media.self.com/photos/679bc8e139935da5394c4bac/master/w_1280,c_limit/winnie-side-plank-with-abduction.gif”}],”xxl”:[{“height”:1280,”width”:1280,”url”:”https://media.self.com/photos/679bc8e139935da5394c4bac/master/w_1280,c_limit/winnie-side-plank-with-abduction.gif”}]}}}” data-testid=”GallerySlideWrapper”>

Katie Thompson
3. Side Plank With Abduction
- Start in a modified forearm side plank by propping your body up on your left forearm, with your elbow stacked underneath your shoulder and your hand in front of your body. Rest your left knee and lower leg on the ground and extend your right leg straight. Squeeze your abs and glutes to lift your hips off the floor.
- Place your right arm on your right hip. Your shoulders, hips, and feet should all be in a straight line. This is the starting position.
- With control, lift your right leg up about a foot or two, then slowly lower it back to the starting position. That’s 1 rep.
- Continue for 10–12 reps, then switch sides and repeat.
Okay, so this one isn’t technically a stretch—it’s more of a strength move that’s great for improving core stability and hip strength. That’s important because being strong in those areas can protect your back by reducing the chances of it taking on too much stress during daily life. This exercise is also a dynamic move for your legs, which makes it a good choice pre-workout or really any time you want to get your blood flowing.
-
n
- Sit with legs out in front of you in a wide stance, feet pressed firmly into the ground. Arms are straight with palms pressed into the ground behind you on either side of your hips.
n
- Keeping your butt and hands on the floor, drop both knees to the right. Pause for a moment, then bring knees up and over as you drop them to the left.
n
- That’s 1 rep. Continue for 10–12 reps.
n
nThis exercise is stellar for improving hip stability. It warms up that joint with both internal and external rotation.“,”contentType”:”photo”,”credit”:”Katie Thompson”,”segmentedSources”:{“sm”:[{“height”:320,”width”:320,”url”:”https://media.self.com/photos/679bc8df7c750670733ae2f5/master/w_320,c_limit/winnie-hip-switches.gif”},{“height”:640,”width”:640,”url”:”https://media.self.com/photos/679bc8df7c750670733ae2f5/master/w_640,c_limit/winnie-hip-switches.gif”}],”md”:[{“height”:640,”width”:640,”url”:”https://media.self.com/photos/679bc8df7c750670733ae2f5/master/w_640,c_limit/winnie-hip-switches.gif”},{“height”:1280,”width”:1280,”url”:”https://media.self.com/photos/679bc8df7c750670733ae2f5/master/w_1280,c_limit/winnie-hip-switches.gif”}],”lg”:[{“height”:1024,”width”:1024,”url”:”https://media.self.com/photos/679bc8df7c750670733ae2f5/master/w_1024,c_limit/winnie-hip-switches.gif”},{“height”:2048,”width”:2048,”url”:”https://media.self.com/photos/679bc8df7c750670733ae2f5/master/w_2048,c_limit/winnie-hip-switches.gif”}],”xl”:[{“height”:1280,”width”:1280,”url”:”https://media.self.com/photos/679bc8df7c750670733ae2f5/master/w_1280,c_limit/winnie-hip-switches.gif”}],”xxl”:[{“height”:1280,”width”:1280,”url”:”https://media.self.com/photos/679bc8df7c750670733ae2f5/master/w_1280,c_limit/winnie-hip-switches.gif”}]}}}” data-testid=”GallerySlideWrapper”>

Katie Thompson
4. Hip Switches
- Sit with legs out in front of you in a wide stance, feet pressed firmly into the ground. Arms are straight with palms pressed into the ground behind you on either side of your hips.
- Keeping your butt and hands on the floor, drop both knees to the right. Pause for a moment, then bring knees up and over as you drop them to the left.
- That’s 1 rep. Continue for 10–12 reps.
This exercise is stellar for improving hip stability. It warms up that joint with both internal and external rotation.
-
n
- Sit with your right knee bent at 90 degrees in front of you, your calf perpendicular to your body and the sole of your foot facing to the left. Keep your right foot flexed.
n
- Let your leg rest flat on the floor.
n
- Place your left knee to the left of your body and bend the knee so that your foot faces behind you. Keep your left foot flexed.
n
- Keep your right glute on the floor. Try to move the left glute as close to the floor as possible. It may not be possible if you’re super tight. This is the starting position.
n
- From here, reach your left up arm and over your head, bending at the waist to tip your torso to the right. Return to the starting position. That’s 1 rep.
n
- Do 10–12 reps, then repeat on the other side.
n
nHere you’re stretching the muscles on the backside of your hips as well as your mid- and upper-back.“,”contentType”:”photo”,”credit”:”Katie Thompson”,”segmentedSources”:{“sm”:[{“height”:320,”width”:320,”url”:”https://media.self.com/photos/679bc8e4bb98ed595c71b973/master/w_320,c_limit/winnie-90-90-with-side-reach.gif”},{“height”:640,”width”:640,”url”:”https://media.self.com/photos/679bc8e4bb98ed595c71b973/master/w_640,c_limit/winnie-90-90-with-side-reach.gif”}],”md”:[{“height”:640,”width”:640,”url”:”https://media.self.com/photos/679bc8e4bb98ed595c71b973/master/w_640,c_limit/winnie-90-90-with-side-reach.gif”},{“height”:1280,”width”:1280,”url”:”https://media.self.com/photos/679bc8e4bb98ed595c71b973/master/w_1280,c_limit/winnie-90-90-with-side-reach.gif”}],”lg”:[{“height”:1024,”width”:1024,”url”:”https://media.self.com/photos/679bc8e4bb98ed595c71b973/master/w_1024,c_limit/winnie-90-90-with-side-reach.gif”},{“height”:2048,”width”:2048,”url”:”https://media.self.com/photos/679bc8e4bb98ed595c71b973/master/w_2048,c_limit/winnie-90-90-with-side-reach.gif”}],”xl”:[{“height”:1280,”width”:1280,”url”:”https://media.self.com/photos/679bc8e4bb98ed595c71b973/master/w_1280,c_limit/winnie-90-90-with-side-reach.gif”}],”xxl”:[{“height”:1280,”width”:1280,”url”:”https://media.self.com/photos/679bc8e4bb98ed595c71b973/master/w_1280,c_limit/winnie-90-90-with-side-reach.gif”}]}}}” data-testid=”GallerySlideWrapper”>

Katie Thompson
5. 90-90 With Side Reach
- Sit with your right knee bent at 90 degrees in front of you, your calf perpendicular to your body and the sole of your foot facing to the left. Keep your right foot flexed.
- Let your leg rest flat on the floor.
- Place your left knee to the left of your body and bend the knee so that your foot faces behind you. Keep your left foot flexed.
- Keep your right glute on the floor. Try to move the left glute as close to the floor as possible. It may not be possible if you’re super tight. This is the starting position.
- From here, reach your left up arm and over your head, bending at the waist to tip your torso to the right. Return to the starting position. That’s 1 rep.
- Do 10–12 reps, then repeat on the other side.
Here you’re stretching the muscles on the backside of your hips as well as your mid- and upper-back.
-
n
- Stand tall with feet wider than shoulder width apart, toes angled slightly out, hands clasped together at chest level.
n
- Shift your weight to the right, while sitting into a right side lunge. You should feel a stretch on the inside of your left leg. Hold for a moment, then repeat on the other side. That’s 1 rep. Continue for 10–12 reps.
n
nThe lateral lunge opens up your inner thighs, which are stabilizing muscles that can often tighten up in anyone with pelvic floor issues. “This one's just a great one for overall hip and pelvic health stability,” Dr. Yu explains.“,”contentType”:”photo”,”credit”:”Katie Thompson”,”segmentedSources”:{“sm”:[{“height”:320,”width”:320,”url”:”https://media.self.com/photos/679bc8e5761e7445040b23e8/master/w_320,c_limit/winnie-alternating-lateral-lunge.gif”},{“height”:640,”width”:640,”url”:”https://media.self.com/photos/679bc8e5761e7445040b23e8/master/w_640,c_limit/winnie-alternating-lateral-lunge.gif”}],”md”:[{“height”:640,”width”:640,”url”:”https://media.self.com/photos/679bc8e5761e7445040b23e8/master/w_640,c_limit/winnie-alternating-lateral-lunge.gif”},{“height”:1280,”width”:1280,”url”:”https://media.self.com/photos/679bc8e5761e7445040b23e8/master/w_1280,c_limit/winnie-alternating-lateral-lunge.gif”}],”lg”:[{“height”:1024,”width”:1024,”url”:”https://media.self.com/photos/679bc8e5761e7445040b23e8/master/w_1024,c_limit/winnie-alternating-lateral-lunge.gif”},{“height”:2048,”width”:2048,”url”:”https://media.self.com/photos/679bc8e5761e7445040b23e8/master/w_2048,c_limit/winnie-alternating-lateral-lunge.gif”}],”xl”:[{“height”:1280,”width”:1280,”url”:”https://media.self.com/photos/679bc8e5761e7445040b23e8/master/w_1280,c_limit/winnie-alternating-lateral-lunge.gif”}],”xxl”:[{“height”:1280,”width”:1280,”url”:”https://media.self.com/photos/679bc8e5761e7445040b23e8/master/w_1280,c_limit/winnie-alternating-lateral-lunge.gif”}]}}}” data-testid=”GallerySlideWrapper”>

Katie Thompson
6. Alternating Lateral Lunge
- Stand tall with feet wider than shoulder width apart, toes angled slightly out, hands clasped together at chest level.
- Shift your weight to the right, while sitting into a right side lunge. You should feel a stretch on the inside of your left leg. Hold for a moment, then repeat on the other side. That’s 1 rep. Continue for 10–12 reps.
The lateral lunge opens up your inner thighs, which are stabilizing muscles that can often tighten up in anyone with pelvic floor issues. “This one’s just a great one for overall hip and pelvic health stability,” Dr. Yu explains.
-
n
- Start on all fours with your shoulders over your wrists and hips over knees.
n
- Take a slow inhale, and on the exhale, round your spine, and drop your head toward the floor (this is the cat posture).
n
- Inhale and lift your head, chest, and tailbone toward the ceiling as you arch your back for cow. This is 1 rep.
n
- Continue to repeat for 10-12 reps.
n
nA yoga pose that’s stellar for overall spinal health, this move promotes range of motion throughout your entire backside, starting from your neck, Dr. Yu explains.“,”contentType”:”photo”,”credit”:”Katie Thompson”,”segmentedSources”:{“sm”:[{“height”:320,”width”:320,”url”:”https://media.self.com/photos/679bc8e5426fee609fd1e60d/master/w_320,c_limit/winnie-cat-cow.gif”},{“height”:640,”width”:640,”url”:”https://media.self.com/photos/679bc8e5426fee609fd1e60d/master/w_640,c_limit/winnie-cat-cow.gif”}],”md”:[{“height”:640,”width”:640,”url”:”https://media.self.com/photos/679bc8e5426fee609fd1e60d/master/w_640,c_limit/winnie-cat-cow.gif”},{“height”:1280,”width”:1280,”url”:”https://media.self.com/photos/679bc8e5426fee609fd1e60d/master/w_1280,c_limit/winnie-cat-cow.gif”}],”lg”:[{“height”:1024,”width”:1024,”url”:”https://media.self.com/photos/679bc8e5426fee609fd1e60d/master/w_1024,c_limit/winnie-cat-cow.gif”},{“height”:2048,”width”:2048,”url”:”https://media.self.com/photos/679bc8e5426fee609fd1e60d/master/w_2048,c_limit/winnie-cat-cow.gif”}],”xl”:[{“height”:1280,”width”:1280,”url”:”https://media.self.com/photos/679bc8e5426fee609fd1e60d/master/w_1280,c_limit/winnie-cat-cow.gif”}],”xxl”:[{“height”:1280,”width”:1280,”url”:”https://media.self.com/photos/679bc8e5426fee609fd1e60d/master/w_1280,c_limit/winnie-cat-cow.gif”}]}}}” data-testid=”GallerySlideWrapper”>

Katie Thompson
7. Cat-Cow
- Start on all fours with your shoulders over your wrists and hips over knees.
- Take a slow inhale, and on the exhale, round your spine, and drop your head toward the floor (this is the cat posture).
- Inhale and lift your head, chest, and tailbone toward the ceiling as you arch your back for cow. This is 1 rep.
- Continue to repeat for 10-12 reps.
A yoga pose that’s stellar for overall spinal health, this move promotes range of motion throughout your entire backside, starting from your neck, Dr. Yu explains.
-
n
- Lie on your right side with knees bent to 90 degrees and your left leg stacked on top of your right. Rest your right hand on top of your left thigh and place your left arm behind your head. This is the starting position.
n
- Keeping your legs still and your left arm behind your head, rotate your upper body to the left. Pause when your left arm gets close to the ground, then return to the starting position.
n
- This is 1 rep.
n
nThis exercise is “a very gentle” way to bring range of motion to your spine, especially your mid and upper back, Dr. Yu says.“,”contentType”:”photo”,”credit”:”Katie Thompson”,”segmentedSources”:{“sm”:[{“height”:320,”width”:320,”url”:”https://media.self.com/photos/679bc8e639935da5394c4bae/master/w_320,c_limit/winnie-side-lying-open-books.gif”},{“height”:640,”width”:640,”url”:”https://media.self.com/photos/679bc8e639935da5394c4bae/master/w_640,c_limit/winnie-side-lying-open-books.gif”}],”md”:[{“height”:640,”width”:640,”url”:”https://media.self.com/photos/679bc8e639935da5394c4bae/master/w_640,c_limit/winnie-side-lying-open-books.gif”},{“height”:1280,”width”:1280,”url”:”https://media.self.com/photos/679bc8e639935da5394c4bae/master/w_1280,c_limit/winnie-side-lying-open-books.gif”}],”lg”:[{“height”:1024,”width”:1024,”url”:”https://media.self.com/photos/679bc8e639935da5394c4bae/master/w_1024,c_limit/winnie-side-lying-open-books.gif”},{“height”:2048,”width”:2048,”url”:”https://media.self.com/photos/679bc8e639935da5394c4bae/master/w_2048,c_limit/winnie-side-lying-open-books.gif”}],”xl”:[{“height”:1280,”width”:1280,”url”:”https://media.self.com/photos/679bc8e639935da5394c4bae/master/w_1280,c_limit/winnie-side-lying-open-books.gif”}],”xxl”:[{“height”:1280,”width”:1280,”url”:”https://media.self.com/photos/679bc8e639935da5394c4bae/master/w_1280,c_limit/winnie-side-lying-open-books.gif”}]}}}” data-testid=”GallerySlideWrapper”>

Katie Thompson
8. Side-Lying Thoracic Rotation
- Lie on your right side with knees bent to 90 degrees and your left leg stacked on top of your right. Rest your right hand on top of your left thigh and place your left arm behind your head. This is the starting position.
- Keeping your legs still and your left arm behind your head, rotate your upper body to the left. Pause when your left arm gets close to the ground, then return to the starting position.
- This is 1 rep.
This exercise is “a very gentle” way to bring range of motion to your spine, especially your mid and upper back, Dr. Yu says.
-
n
- Lie on your back with your knees bent, feet firmly planted on the floor, arms resting at your sides.
n
- Keeping your upper back pressed into the ground, drop both knees to the left. Pause for a moment, then drop both knees to the right. That’s 1 rep.
n
- Continue this pattern, alternating sides, for 10–12 reps.
n
nAnother low-intensity stretch, this exercise opens up your lower back. It's “great for winding down after a long work day,” Dr. Yu says.“,”contentType”:”photo”,”credit”:”Katie Thompson”,”segmentedSources”:{“sm”:[{“height”:320,”width”:320,”url”:”https://media.self.com/photos/679bc8e839935da5394c4bb0/master/w_320,c_limit/winnie-windshield-wipers.gif”},{“height”:640,”width”:640,”url”:”https://media.self.com/photos/679bc8e839935da5394c4bb0/master/w_640,c_limit/winnie-windshield-wipers.gif”}],”md”:[{“height”:640,”width”:640,”url”:”https://media.self.com/photos/679bc8e839935da5394c4bb0/master/w_640,c_limit/winnie-windshield-wipers.gif”},{“height”:1280,”width”:1280,”url”:”https://media.self.com/photos/679bc8e839935da5394c4bb0/master/w_1280,c_limit/winnie-windshield-wipers.gif”}],”lg”:[{“height”:1024,”width”:1024,”url”:”https://media.self.com/photos/679bc8e839935da5394c4bb0/master/w_1024,c_limit/winnie-windshield-wipers.gif”},{“height”:2048,”width”:2048,”url”:”https://media.self.com/photos/679bc8e839935da5394c4bb0/master/w_2048,c_limit/winnie-windshield-wipers.gif”}],”xl”:[{“height”:1280,”width”:1280,”url”:”https://media.self.com/photos/679bc8e839935da5394c4bb0/master/w_1280,c_limit/winnie-windshield-wipers.gif”}],”xxl”:[{“height”:1280,”width”:1280,”url”:”https://media.self.com/photos/679bc8e839935da5394c4bb0/master/w_1280,c_limit/winnie-windshield-wipers.gif”}]}}}” data-testid=”GallerySlideWrapper”>

Katie Thompson
9. Windshield Wipers
- Lie on your back with your knees bent, feet firmly planted on the floor, arms resting at your sides.
- Keeping your upper back pressed into the ground, drop both knees to the left. Pause for a moment, then drop both knees to the right. That’s 1 rep.
- Continue this pattern, alternating sides, for 10–12 reps.
Another low-intensity stretch, this exercise opens up your lower back. It’s “great for winding down after a long work day,” Dr. Yu says.
-
n
- Get into a kneeling lunge: Take a big step forward with your right foot, so that you are in a staggered stance.
n
- Bend your right knee and drop into a lunge, keeping your left leg straight behind you with your toes on the ground, so you feel a stretch at the front of your left thigh.
n
- Place your left hand on the floor and then reach down and touch your right elbow to the ground, placing the elbow on the inside of your right foot. This is the starting position.
n
- From here, twist your upper body to the right as you lift your right elbow off the ground and extend your right arm toward the ceiling.
n
- Pause, then reverse the motion to return to the starting position. That’s 1 rep. Do 10–12 reps, then switch sides and repeat.
n
nThis is one of Dr. Yu’s favorites (and aptly named) because “it targets quite literally everything,” she says—from your ankles to your hips to your upper back. “It's great to include as part of a warm-up before a workout.”“,”contentType”:”photo”,”credit”:”Katie Thompson”,”segmentedSources”:{“sm”:[{“height”:320,”width”:320,”url”:”https://media.self.com/photos/679bc8ec426fee609fd1e60f/master/w_320,c_limit/winnie-worlds-greatest-stretch.gif”},{“height”:640,”width”:640,”url”:”https://media.self.com/photos/679bc8ec426fee609fd1e60f/master/w_640,c_limit/winnie-worlds-greatest-stretch.gif”}],”md”:[{“height”:640,”width”:640,”url”:”https://media.self.com/photos/679bc8ec426fee609fd1e60f/master/w_640,c_limit/winnie-worlds-greatest-stretch.gif”},{“height”:1280,”width”:1280,”url”:”https://media.self.com/photos/679bc8ec426fee609fd1e60f/master/w_1280,c_limit/winnie-worlds-greatest-stretch.gif”}],”lg”:[{“height”:1024,”width”:1024,”url”:”https://media.self.com/photos/679bc8ec426fee609fd1e60f/master/w_1024,c_limit/winnie-worlds-greatest-stretch.gif”},{“height”:2048,”width”:2048,”url”:”https://media.self.com/photos/679bc8ec426fee609fd1e60f/master/w_2048,c_limit/winnie-worlds-greatest-stretch.gif”}],”xl”:[{“height”:1280,”width”:1280,”url”:”https://media.self.com/photos/679bc8ec426fee609fd1e60f/master/w_1280,c_limit/winnie-worlds-greatest-stretch.gif”}],”xxl”:[{“height”:1280,”width”:1280,”url”:”https://media.self.com/photos/679bc8ec426fee609fd1e60f/master/w_1280,c_limit/winnie-worlds-greatest-stretch.gif”}]}}}” data-testid=”GallerySlideWrapper”>

Katie Thompson
10. World’s Greatest Stretch
- Get into a kneeling lunge: Take a big step forward with your right foot, so that you are in a staggered stance.
- Bend your right knee and drop into a lunge, keeping your left leg straight behind you with your toes on the ground, so you feel a stretch at the front of your left thigh.
- Place your left hand on the floor and then reach down and touch your right elbow to the ground, placing the elbow on the inside of your right foot. This is the starting position.
- From here, twist your upper body to the right as you lift your right elbow off the ground and extend your right arm toward the ceiling.
- Pause, then reverse the motion to return to the starting position. That’s 1 rep. Do 10–12 reps, then switch sides and repeat.
This is one of Dr. Yu’s favorites (and aptly named) because “it targets quite literally everything,” she says—from your ankles to your hips to your upper back. “It’s great to include as part of a warm-up before a workout.”
-
n
- Stand tall with your feet hip-distance apart. Clasp your hands together behind your head and point your elbows out to the sides.
n
- Bend at the waist and tip your torso to the left. When you feel a stretch on your right side, stop and come back to standing.
n
- Now repeat on the other side to complete 1 rep.
n
- Continue alternating sides for 10–12 reps.
n
nHere you’re targeting your shoulders, upper back, and mid-back. This is “really easy to do on the go,” Dr. Yu says, making it a simple stretch to slot into a busy day, even at the office.“,”contentType”:”photo”,”credit”:”Katie Thompson”,”segmentedSources”:{“sm”:[{“height”:320,”width”:320,”url”:”https://media.self.com/photos/679bc8ef426fee609fd1e611/master/w_320,c_limit/winnie-standing-side-bends.gif”},{“height”:640,”width”:640,”url”:”https://media.self.com/photos/679bc8ef426fee609fd1e611/master/w_640,c_limit/winnie-standing-side-bends.gif”}],”md”:[{“height”:640,”width”:640,”url”:”https://media.self.com/photos/679bc8ef426fee609fd1e611/master/w_640,c_limit/winnie-standing-side-bends.gif”},{“height”:1280,”width”:1280,”url”:”https://media.self.com/photos/679bc8ef426fee609fd1e611/master/w_1280,c_limit/winnie-standing-side-bends.gif”}],”lg”:[{“height”:1024,”width”:1024,”url”:”https://media.self.com/photos/679bc8ef426fee609fd1e611/master/w_1024,c_limit/winnie-standing-side-bends.gif”},{“height”:2048,”width”:2048,”url”:”https://media.self.com/photos/679bc8ef426fee609fd1e611/master/w_2048,c_limit/winnie-standing-side-bends.gif”}],”xl”:[{“height”:1280,”width”:1280,”url”:”https://media.self.com/photos/679bc8ef426fee609fd1e611/master/w_1280,c_limit/winnie-standing-side-bends.gif”}],”xxl”:[{“height”:1280,”width”:1280,”url”:”https://media.self.com/photos/679bc8ef426fee609fd1e611/master/w_1280,c_limit/winnie-standing-side-bends.gif”}]}}}” data-testid=”GallerySlideWrapper”>

Katie Thompson
11. Standing Side Bench Stretch
- Stand tall with your feet hip-distance apart. Clasp your hands together behind your head and point your elbows out to the sides.
- Bend at the waist and tip your torso to the left. When you feel a stretch on your right side, stop and come back to standing.
- Now repeat on the other side to complete 1 rep.
- Continue alternating sides for 10–12 reps.
Here you’re targeting your shoulders, upper back, and mid-back. This is “really easy to do on the go,” Dr. Yu says, making it a simple stretch to slot into a busy day, even at the office.
-
n
- Kneel on your left knee. Place your right foot flat on the floor in front of you, knee bent.
n
- Slowly lean forward to feel a gentle stretch at the front of the left hip.
n
- Squeeze your butt; this will allow you to stretch your hip flexor even more.
n
- Hold for 30 seconds.
n
- Switch sides and repeat.
n
nThis targets your hip flexors (muscles at the front of your hip), which often tighten after lots of sitting. This can yank your lower back into an arched position, which can place a lot of extra stress on your spine over time. So this stretch does double duty, loosening achy hips while also bolstering spinal health.“,”contentType”:”photo”,”credit”:”Katie Thompson”,”segmentedSources”:{“sm”:[{“height”:256,”width”:320,”url”:”https://media.self.com/photos/679bcca0426fee609fd1e613/master/w_320,c_limit/winnie-kneeling-hip-flexor-stretch.jpg”},{“height”:512,”width”:640,”url”:”https://media.self.com/photos/679bcca0426fee609fd1e613/master/w_640,c_limit/winnie-kneeling-hip-flexor-stretch.jpg”}],”md”:[{“height”:512,”width”:640,”url”:”https://media.self.com/photos/679bcca0426fee609fd1e613/master/w_640,c_limit/winnie-kneeling-hip-flexor-stretch.jpg”},{“height”:1024,”width”:1280,”url”:”https://media.self.com/photos/679bcca0426fee609fd1e613/master/w_1280,c_limit/winnie-kneeling-hip-flexor-stretch.jpg”}],”lg”:[{“height”:819,”width”:1024,”url”:”https://media.self.com/photos/679bcca0426fee609fd1e613/master/w_1024,c_limit/winnie-kneeling-hip-flexor-stretch.jpg”},{“height”:1639,”width”:2048,”url”:”https://media.self.com/photos/679bcca0426fee609fd1e613/master/w_2048,c_limit/winnie-kneeling-hip-flexor-stretch.jpg”}],”xl”:[{“height”:1024,”width”:1280,”url”:”https://media.self.com/photos/679bcca0426fee609fd1e613/master/w_1280,c_limit/winnie-kneeling-hip-flexor-stretch.jpg”}],”xxl”:[{“height”:1024,”width”:1280,”url”:”https://media.self.com/photos/679bcca0426fee609fd1e613/master/w_1280,c_limit/winnie-kneeling-hip-flexor-stretch.jpg”}]}}}” data-testid=”GallerySlideWrapper”>

Katie Thompson
12. Kneeling Hip Flexor Stretch
- Kneel on your left knee. Place your right foot flat on the floor in front of you, knee bent.
- Slowly lean forward to feel a gentle stretch at the front of the left hip.
- Squeeze your butt; this will allow you to stretch your hip flexor even more.
- Hold for 30 seconds.
- Switch sides and repeat.
This targets your hip flexors (muscles at the front of your hip), which often tighten after lots of sitting. This can yank your lower back into an arched position, which can place a lot of extra stress on your spine over time. So this stretch does double duty, loosening achy hips while also bolstering spinal health.
-
n
- Sit down on a bench or step with your left leg bent, foot firmly planted on the ground. Right leg is extended straight in front of you with the heel on the ground, toes pointed up. Place your hands on your hips.
n
- Keeping a flat back, tip your torso forward. Stop when you feel a stretch down the back of your right leg. Hold for 30 seconds.
n
- Switch sides and repeat.
n
nAs the name suggests, this one targets your hamstrings, the muscles on the back of your thighs. Because they attach to your hips, loosening them up can improve hip mobility, Dr. Yu explains. It’s an easy one to do at your desk—ideal for the busy worker.“,”contentType”:”photo”,”credit”:”Katie Thompson”,”segmentedSources”:{“sm”:[{“height”:256,”width”:320,”url”:”https://media.self.com/photos/679bcca66c89faf880e4f678/master/w_320,c_limit/winnie-seated-hamstring-stretch.jpg”},{“height”:512,”width”:640,”url”:”https://media.self.com/photos/679bcca66c89faf880e4f678/master/w_640,c_limit/winnie-seated-hamstring-stretch.jpg”}],”md”:[{“height”:512,”width”:640,”url”:”https://media.self.com/photos/679bcca66c89faf880e4f678/master/w_640,c_limit/winnie-seated-hamstring-stretch.jpg”},{“height”:1024,”width”:1280,”url”:”https://media.self.com/photos/679bcca66c89faf880e4f678/master/w_1280,c_limit/winnie-seated-hamstring-stretch.jpg”}],”lg”:[{“height”:819,”width”:1024,”url”:”https://media.self.com/photos/679bcca66c89faf880e4f678/master/w_1024,c_limit/winnie-seated-hamstring-stretch.jpg”},{“height”:1639,”width”:2048,”url”:”https://media.self.com/photos/679bcca66c89faf880e4f678/master/w_2048,c_limit/winnie-seated-hamstring-stretch.jpg”}],”xl”:[{“height”:1024,”width”:1280,”url”:”https://media.self.com/photos/679bcca66c89faf880e4f678/master/w_1280,c_limit/winnie-seated-hamstring-stretch.jpg”}],”xxl”:[{“height”:1024,”width”:1280,”url”:”https://media.self.com/photos/679bcca66c89faf880e4f678/master/w_1280,c_limit/winnie-seated-hamstring-stretch.jpg”}]}}}” data-testid=”GallerySlideWrapper”>

Katie Thompson
13. Seated Hamstring Stretch
- Sit down on a bench or step with your left leg bent, foot firmly planted on the ground. Right leg is extended straight in front of you with the heel on the ground, toes pointed up. Place your hands on your hips.
- Keeping a flat back, tip your torso forward. Stop when you feel a stretch down the back of your right leg. Hold for 30 seconds.
- Switch sides and repeat.
As the name suggests, this one targets your hamstrings, the muscles on the back of your thighs. Because they attach to your hips, loosening them up can improve hip mobility, Dr. Yu explains. It’s an easy one to do at your desk—ideal for the busy worker.
-
n
- With your hands on your hips and keeping a flat back, tip your torso forward. Stop when you feel a stretch in your right glute. Hold for 30 seconds.
n
- Switch sides and repeat.
n
nThis static stretch is “great for anyone with hip and lower back tightness,” Dr. Yu says. It’s another option that’s super simple to do from your desk chair.nDemoing the moves above is Winnie Yu, DPT, CSCS, a NYC-based physical therapist and strength coach.nRelated:n
- n
- A 5-Move Mobility Workout That’ll Make You Feel (Almost) as Limber as a Gymnast
- 14 Standing Stretches You Can Do Literally Anywhere to Loosen Up Your Entire Body
- 4 Quick Stretches to Do If You’ve Been Sitting in the Car for Hours
n
n
n
nGet more of SELF’s great service journalism delivered right to your inbox.“,”contentType”:”photo”,”credit”:”Katie Thompson”,”segmentedSources”:{“sm”:[{“height”:256,”width”:320,”url”:”https://media.self.com/photos/679bccab39935da5394c4bb2/master/w_320,c_limit/winnie-seated-figure-4.jpg”},{“height”:512,”width”:640,”url”:”https://media.self.com/photos/679bccab39935da5394c4bb2/master/w_640,c_limit/winnie-seated-figure-4.jpg”}],”md”:[{“height”:512,”width”:640,”url”:”https://media.self.com/photos/679bccab39935da5394c4bb2/master/w_640,c_limit/winnie-seated-figure-4.jpg”},{“height”:1024,”width”:1280,”url”:”https://media.self.com/photos/679bccab39935da5394c4bb2/master/w_1280,c_limit/winnie-seated-figure-4.jpg”}],”lg”:[{“height”:819,”width”:1024,”url”:”https://media.self.com/photos/679bccab39935da5394c4bb2/master/w_1024,c_limit/winnie-seated-figure-4.jpg”},{“height”:1638,”width”:2048,”url”:”https://media.self.com/photos/679bccab39935da5394c4bb2/master/w_2048,c_limit/winnie-seated-figure-4.jpg”}],”xl”:[{“height”:1024,”width”:1280,”url”:”https://media.self.com/photos/679bccab39935da5394c4bb2/master/w_1280,c_limit/winnie-seated-figure-4.jpg”}],”xxl”:[{“height”:1024,”width”:1280,”url”:”https://media.self.com/photos/679bccab39935da5394c4bb2/master/w_1280,c_limit/winnie-seated-figure-4.jpg”}]}}}” data-testid=”GallerySlideWrapper”>

Katie Thompson
14. Seated Figure-4 Stretch
